Transform Flat SVGs into Stunning Layered Cake Toppers
There is a distinct magic in turning a digital file into a tangible, three-dimensional object. For paper crafters and designers alike, the transition from a flat screen to a physical product often presents a creative challenge. This is where understanding how to manipulate digital assets becomes crucial. The concept of "How to Turn a Flat Design into a Layered Cake Topper" is not just about cutting paper; it is about mastering depth, visual hierarchy, and the structural integrity of design. It is a practical application of design principles that can elevate a simple party accessory into a piece of custom art.
The Anatomy of a Layered Design
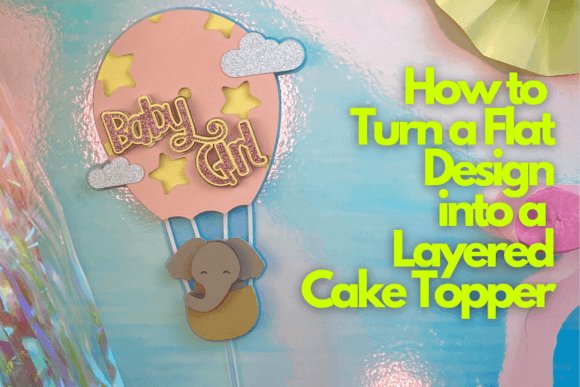
At its core, this project, guided by Ella from The Craftaholic Studio, focuses on a baby elephant in a hot air balloon. The visual appeal lies in the interplay of shapes and shadows. A flat design, often a simple SVG file, is reimagined. The process involves deconstructing the image. You are not just cutting out a silhouette; you are creating a stack. The bottom layer provides the foundation and stability. The middle layers add color and shape, building the form. The top layer offers the finest details, the eyes, the basket weave, the balloon's pattern. This layering technique creates a natural shadow and a tactile quality that a single, flat piece of paper can never achieve. The personality of the final topper is whimsical, custom, and professional, moving it from a generic party store item to a centerpiece that reflects personal attention to detail.
From Digital File to Physical Craft: Tools and Techniques
The journey begins in software like Cricut Design Space. Here, the flat vector design is not merely uploaded and cut. The class teaches you to use the software's tools to strategically duplicate, offset, and slice elements. You learn to create the very layers that will define the final product. This is a fundamental skill for any crafter working with digital files. The choice of materials is equally critical. A standard cardstock works, but for a professional result, specific weights and textures are recommended. A heavier cardstock, perhaps 80lb or 100lb, provides the necessary rigidity for the base and middle layers. A specialty paper, like a glitter or foil cardstock, can be used for accent layers to add a premium touch. The right tools—a precision craft knife, a strong adhesive, and perhaps a scoring tool—ensure clean lines and secure assembly.
The assembly process is where the design truly comes to life. It requires patience and a methodical approach. Each layer is affixed to the one below, often using foam adhesive squares or dots. These small spacers are the secret weapon. They create consistent, intentional depth between each level, transforming a stack of paper into a cohesive, sculpted form. This technique is a staple in advanced paper crafting and is directly applicable to other projects like shadow boxes, pop-up cards, and even custom signage. The bonus lessons in the class extend this knowledge, offering a foundation you can apply to countless other creative font and design projects.
Strategic Applications Beyond the Cake
While the immediate result is a cake topper, the skills learned have broad applications. Think about branding for a small bakery or event planning business. A custom, layered topper featuring a client's logo or mascot becomes a powerful branding asset. It is a unique design element that photographs beautifully, enhancing social media graphics and portfolio images. For a blogger or content creator, understanding how to create such tangible items opens up new avenues for content, tutorials, and even product lines. The process itself—deconstructing a design, planning layers, selecting materials—is a microcosm of larger branding and packaging design projects. It teaches you to think about how a flat logo design will translate into a physical environment, considering depth, light, and viewer perspective.
Choosing Your Design Assets Wisely
The success of a layered project hinges on the initial design file. Not all flat designs are suited for layering. A good candidate has clear, distinct shapes and a logical separation of elements. A complex, highly detailed illustration might become muddy when reduced to three or four layers. The baby elephant example works well because the subject has defined sections: the balloon, the basket, the elephant's body, and its features. When sourcing or creating your SVG files, look for this clarity. Consider the final scale. A design with very thin lines or tiny details may not cut or layer well at a small size. This is where a strong understanding of typography and design assets becomes valuable. You are not just picking a cute image; you are evaluating a graphic for its structural and aesthetic viability in a new medium.
The choice of a display font or a creative font for any text element follows similar logic. If your topper includes a name or phrase, the typeface must be legible at the final size and have a personality that complements the main illustration. A whimsical script font might pair beautifully with the elephant, but it needs to be clean enough to cut from paper. This consideration of font pairing and readability is a direct parallel to web design or editorial design, where visual hierarchy guides the viewer's eye. The layered topper is, in essence, a three-dimensional typographic and graphic composition.
Building Confidence in Your Creative Process
Ultimately, learning how to turn a flat design into a layered cake topper is about building confidence with digital tools and physical materials. It demystifies the process of creating depth. It shows that with the right technique, a simple design can achieve a high-end, custom look. This skill empowers entrepreneurs to offer unique products, helps hobbyists elevate their crafts, and gives designers a tangible understanding of how their digital work interacts with the physical world. The principles of layering, material selection, and meticulous assembly are timeless in the craft and design fields. Mastering them here provides a solid foundation for tackling more ambitious projects, whether in paper, vinyl, wood, or other substrates. The journey from a flat SVG to a beautiful, layered creation is a rewarding exercise in creativity and precision.